
A raised bed can look simple on paper: four sides, some screws, and a load of soil. The mistakes usually happen before construction starts.
Make the bed a little too wide and the center becomes awkward to reach. Put it too far from a hose and watering turns into a chore. Build it twice as tall as necessary and you may discover that filling it costs more than the frame.
That’s why learning How to Build a Raised Garden Bed starts with planning where your hands, water, plants, and pathways need to go—not with cutting lumber.
The short answer: Build a raised garden bed by choosing a level, sunny location, sizing the bed so you can reach the center without stepping into it, assembling a durable frame, preparing the ground underneath, leveling the structure, and filling it with an appropriate soil-and-compost mix. Plan irrigation and calculate soil volume before buying materials.
University of Maryland Extension notes that raised beds commonly measure about 2 to 4 feet across, with the length determined by the site, and that beds over native soil allow plant roots to continue into the ground underneath.
Before You Build: Plan the Raised Bed
A few minutes with a tape measure can prevent most of the annoying problems that show up later.
Pick the Right Location
For a vegetable bed, start with sunlight. Most popular warm-season vegetables do best with at least six hours of direct sun, and preferably more. The site should also be reasonably level and close enough to a water source that regular irrigation won’t become a nuisance.
Watch the location through part of a sunny day before committing. A spot that looks bright at breakfast may be shaded by a fence, tree, garage, or neighboring structure by afternoon.
Also think beyond the bed itself. Leave room for the hose, wheelbarrow, mower, garden cart, or mobility device you’ll actually use.
If the project involves digging, driving stakes, installing irrigation, or excavating around the bed, contact 811 before you dig. The U.S. Department of Transportation identifies 811 as the nationwide call-before-you-dig number.
Choose the Best Width

The best width is the widest bed whose center you can comfortably reach without stepping on the growing soil.
Four feet is common when you can work from both long sides. Colorado State and University of Georgia guidance generally puts practical vegetable-bed widths around 3 to 4 feet.
But 4 feet isn’t a rule.
If one long side will sit against a fence or wall, a narrower bed—often around 2 to 3 feet—makes more sense because you’re reaching from only one direction.
This is one reason reach matters more than a fashionable dimension.
How Long Should the Bed Be?
Length is flexible. An 8-foot bed is popular because 8-foot lumber is widely sold and creates a useful growing area without an excessively long walk around the structure.
Longer beds are possible, but think about traffic. A 16-foot bed may save a little framing material compared with two shorter beds, yet become irritating every time you need to get from one side to the other.
How Deep Should a Raised Garden Bed Be?
If the bed sits over healthy, loosened native soil, it doesn’t have to contain the entire root system. Roots can grow down into the ground below.
A frame around 10 to 12 inches high is a practical starting point for many home gardens, but the right depth depends on the crop, underlying soil, and accessibility needs.
The situation changes on concrete or another hard, impermeable surface. University of Maryland Extension recommends at least about 8 inches for crops such as leafy greens, beans, and cucumbers on hard surfaces, while tomatoes, peppers, and squash may need roughly 12 to 24 inches.
Deeper is not automatically better. Every extra inch means more material to fill.
Design for Accessibility Before Construction
Taller beds can reduce bending, but height is only part of accessibility.
You also need to consider:
- How far the gardener can comfortably reach.
- Whether the bed will be approached from one side or both.
- Enough pathway width for a wheelbarrow, walker, chair, or wheelchair.
- Stable, reasonably level path surfaces.
- Space to turn or reposition comfortably.
University of Georgia Extension recommends designing bed width around reach and notes that wider paths may be needed for carts, wheelbarrows, or wheelchair access. University of Georgia raised-bed dimension guidance
There isn’t one universal accessible bed dimension. Build for the person who will actually use it.
Materials and Tools You’ll Need
For a straightforward 4-by-8-foot wooden bed roughly 11 inches high, one efficient approach is to use three 2-by-12-by-8-foot boards: two stay full length for the sides, and the third is cut into two 4-foot end pieces.
Remember that nominal and actual lumber dimensions differ. A typical nominal 2-by-12 is thinner and narrower than its name suggests, just as a nominal 2-by-6 is commonly about 1.5 inches by 5.5 inches in actual dimensions.
Basic Materials
- Three 2x12x8 boards for the example design, or equivalent lumber.
- Exterior-rated screws suitable for your lumber.
- Optional corner posts or blocks for reinforcement.
- Optional mid-span bracing for long sides.
- Hardware cloth if burrowing animals are a recurring problem.
- Soil, compost, or an appropriate raised-bed growing mix.
- Mulch for the soil surface after planting.
- Optional drip line or soaker hose.
If you’d rather use 2×6 lumber, two stacked courses make a frame about 11 inches high. A 4-by-8-foot version would use six 8-foot boards if two are cut in half for the ends.
Planning around stock lumber sizes means fewer cuts and less waste.
Basic Tools
You’ll usually need a tape measure, pencil, level, drill/driver, driver bit, square, shovel or spade, rake, and gloves.
A circular or miter saw is convenient but not mandatory. If your retailer offers cutting services, having the end boards cut to length at the store can simplify the project considerably.
Wear eye protection when cutting or drilling. Follow the tool manufacturer’s instructions, handle splintered lumber carefully, and get help with heavy boards or bulk soil rather than trying to lift awkward loads alone.
Raised Garden Bed Material Comparison
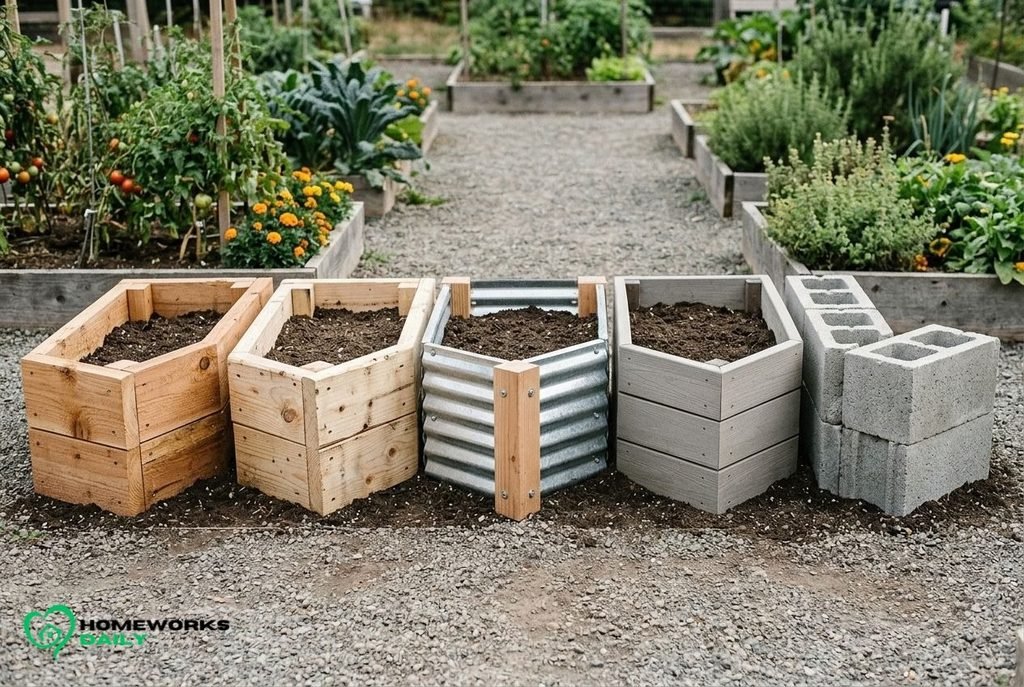
| Material | Relative Durability | Cost Level | Best For | Main Drawback |
| Cedar | High for untreated wood | $$$ | Gardeners wanting naturally decay-resistant wood | Higher upfront cost |
| Untreated pine/fir | Lower | $ | Budget builds and easy replacement | Decays faster in constant soil contact |
| Modern residential pressure-treated lumber | High | $$ | Cost-conscious gardeners wanting longer service | Some gardeners prefer to avoid treated material |
| Galvanized metal | Product-dependent, generally durable | –$ | Kits and clean, thin walls | Quality and edge design vary by product |
| Composite/recycled plastic boards | Product-dependent | $$$ | Low-maintenance frames | Higher cost; fastening requirements vary |
| Brick/block/stone | Very high | –$$ | Permanent beds and landscape integration | Heavy, labor-intensive and harder to relocate |
University of Maryland lists wood, masonry, rigid recycled plastic, and other durable materials as raised-bed options. Oregon State notes that cedar and redwood resist decay better than pine and fir, while modern pressure-treated lumber can extend service life.
Is Pressure-Treated Lumber Safe for Vegetable Beds?
Modern pressure-treated lumber should not automatically be confused with the older CCA-treated lumber that drives many online warnings.
The EPA says manufacturers voluntarily ended virtually all residential uses of chromated copper arsenate, or CCA, at the end of 2003. EPA information on CCA-treated wood
Oregon State University’s current guidance discusses modern copper-based treatments such as copper azole and reports reassuring results from its raised-bed research. It recommends choosing lumber labeled for residential and appropriate ground-contact use. Oregon State guidance on pressure-treated raised beds
Avoid old unknown treated lumber and railroad ties for food-growing beds. If you’d rather eliminate the question entirely, cedar, another naturally durable species, masonry, or an appropriate manufactured bed material are straightforward alternatives.
How to Build a Raised Garden Bed Step by Step

A basic wooden bed is a realistic beginner DIY project. Home Depot’s current raised-bed project guide classifies a simple version as beginner-level and estimates roughly 2–4 hours, although ground preparation, hauling soil, difficult terrain, or a larger structure can extend the job.
Step 1: Measure and Mark the Location
Lay out the footprint using stakes and string, marking paint, or the unassembled boards themselves.
Measure both diagonals. If the two diagonal measurements match, the rectangle is square.
Then test your reach. Stand where the future pathway will be and make sure you can comfortably reach the center.
Step 2: Prepare the Ground
Remove aggressive perennial weeds and bulky vegetation. If the soil underneath is compacted, loosening its surface can help roots move downward.
You don’t usually need to excavate the entire footprint.
On sloping ground, level or terrace the site instead of simply setting the box at an angle. A frame that is level makes watering and soil management easier.
Step 3: Cut and Arrange the Lumber
For the 4-by-8-foot example using three 2x12x8 boards, leave two boards at full length and cut the third into two 4-foot ends.
Dry-fit the pieces before fastening anything. This is the moment to catch a wrong cut, warped board, blocked pathway, or unexpectedly tight corner.
Step 4: Assemble the Frame
Place the boards on edge and fasten each end securely to the long sides or to interior corner posts.
Predrilling near board ends can reduce splitting, particularly with dry or brittle lumber.
Use exterior fasteners suitable for the chosen wood. If you’re using treated lumber, follow the lumber or fastener manufacturer’s compatibility guidance.
For long or tall wooden sides, adding stakes, posts, or intermediate bracing can reduce outward bowing once the bed is filled.
Step 5: Position and Level the Bed
Move the assembled frame into its final position and check it front to back and side to side with a level.
Correct low spots before adding soil.
This feels fussy when the bed is empty. It feels much more annoying after it contains a cubic yard of growing medium.
Step 6: Decide What Belongs on the Bottom
For most beds built directly over garden soil, you don’t need an impermeable bottom.
University of Minnesota Extension specifically notes that a barrier between raised-bed soil and the soil underneath is usually unnecessary and may restrict root growth. If rodents are a recurring problem, hardware cloth can be placed underneath. University of Minnesota raised-bed guidance
Avoid lining an open-bottom bed with solid plastic. It can interfere with drainage and root movement.
For a bed on a patio or another hard surface, a permeable liner may help retain the growing medium while still allowing water to drain.
Step 7: Fill the Bed
Don’t think of the fill as an afterthought. It is the growing environment and can be the biggest expense.
For beds installed over usable garden soil, University of Maryland recommends working with the soil that’s already there and adding compost where appropriate rather than assuming the entire depth has to be imported. In other situations, a mixture of quality topsoil or growing medium and compost may be appropriate. Beds on hard surfaces require a different mix because roots cannot extend into native ground. University of Maryland raised-bed guidance
Blend compatible materials instead of creating several sharply separated layers.
And if you’re considering adding coffee grounds or other household amendments, don’t treat them as a substitute for balanced soil or compost. HomeWorks Daily has a separate guide on plants and coffee grounds that can be reviewed alongside local Extension recommendations.
How Much Soil Do You Need?

Use this formula:
Volume = length × width × soil depth
Keep all measurements in the same units.
For a 4-by-8-foot bed with 10 inches of actual soil depth:
10 inches ÷ 12 = 0.833 feet
4 × 8 × 0.833 = approximately 26.7 cubic feet
Since 27 cubic feet equals 1 cubic yard, that bed requires almost exactly 1 cubic yard of material.
If you were using only 2-cubic-foot bags, the mathematical requirement would be about 13.3 bags, so you’d need to purchase 14 bags.
Don’t forget that many gardeners leave a little space below the top edge for watering and mulch rather than filling the frame flush to the rim.
How Much Does a Raised Garden Bed Cost?
There isn’t a useful single national price. Lumber species, bed height, soil source, delivery fees, hardware, region, and date can change the total dramatically.
The biggest surprise is often soil volume.
As a current retail illustration, Home Depot recently listed a 2-cubic-foot raised-bed mix at $9.97. Filling the 4-by-8-by-10-inch example entirely with that one product would require 14 bags, or about $139.58 before tax. That is only an illustration—not a recommendation to fill every bed with that particular product—and local pricing and availability vary.
A one-pound package of common 3-inch exterior deck screws was also listed around $10.97 in the same retail research.
For a deeper bed, soil volume rises quickly. Double the soil depth and you essentially double the volume of fill.
Before buying dozens of bags, compare the delivered cost of bulk topsoil/compost blends from reputable local landscape suppliers. Ask what the material contains and, when possible, whether soil-test information is available.
Common Raised Garden Bed Mistakes
Making the Bed Too Wide
If you have to step into the bed to reach plants, you’ve given up one of the main benefits of a raised bed: keeping foot traffic off the growing soil.
Building Tall Without Calculating Fill
A 24-inch bed may look convenient, but it requires twice the fill volume of a 12-inch bed with the same footprint.
If extra height is mainly for accessibility, consider designs that bring the growing surface upward without filling the entire structure with two feet of imported soil.
Forgetting Irrigation Until the End
Run or plan drip tubing, hose access, or watering connections before filling the bed. It’s easier to change the layout while the frame is empty.
Raised beds can dry faster than surrounding ground, particularly in hot or dry conditions.
If you’re also working out the rest of your yard’s watering schedule, see HomeWorks Daily’s guide to the best time to water a lawn.
Using Solid Plastic Under an Open-Bottom Bed
Roots and water generally benefit from contact with the soil below. Use hardware cloth for burrowing pests when needed rather than automatically sealing off the bottom.
Ignoring the Pathways
Design the paths at the same time as the beds.
Ask whether a wheelbarrow can turn, a mower can pass, two people can work without squeezing past each other, and the primary gardener can comfortably approach the growing area.
Assuming Raised Beds Solve Every Soil Problem
If you’re growing food on an urban or otherwise questionable site, consider testing the existing soil. University of Maryland specifically recommends soil testing and advises testing for lead when food crops will be grown in potentially contaminated soil.
What Can You Grow in a Raised Bed?
Raised beds work well for many vegetables, herbs, flowers, and small fruits.
Leafy greens, radishes, carrots, bush beans, peppers, tomatoes, cucumbers, herbs, and similar garden crops can all fit, provided they have appropriate soil depth, sunlight, water, and spacing.
Use the vertical space too. Trellises can support peas, pole beans, and cucumbers while leaving more soil surface available.
Position tall crops and trellises where they won’t unnecessarily shade shorter plants. University of Maryland recommends putting taller crops toward the north and west sides of a vegetable garden where appropriate.
If your goal is to grow more food at home, HomeWorks Daily’s article on high-fiber fruits you can grow at home may provide ideas for expanding beyond the first bed.
Raised Garden Bed Maintenance Tips
Check the frame at least seasonally for loose fasteners, outward bowing, rot, rust, cracked masonry, or other deterioration.
Add compost according to your soil’s needs rather than continually raising the soil level without a plan.
Mulch around established plants where appropriate to help moderate moisture loss and weeds. Raised-bed soil can dry faster than surrounding soil, so check actual soil moisture instead of watering only according to the calendar. Oregon State recommends checking moisture in the root zone and adjusting irrigation to soil conditions.
Expect some settling of fresh fill. Top up the bed when necessary with an appropriate soil or compost amendment rather than random debris.
When a Raised Bed May Not Be the Best Choice
A raised bed isn’t automatically an upgrade.
An in-ground garden may make more sense if you already have productive, well-drained soil, want the lowest possible startup cost, need a large growing area, or don’t want to import a substantial amount of soil.
Raised beds also require closer moisture management in hot, dry climates because they can dry faster. They are relatively permanent once filled, and sloped sites need proper terracing or leveling.
For a small patio, containers may be easier. For a large vegetable plot on good soil, simple in-ground rows or unframed raised growing beds may be more economical.
The right choice is the one that solves a problem you actually have.
Frequently Asked Questions
What is the cheapest way to build a raised garden bed?
Use a low, simple design and avoid buying more soil than necessary. Untreated pine or fir is generally cheaper than naturally decay-resistant cedar, although it tends to deteriorate sooner. An unframed raised mound is even cheaper because it eliminates the enclosure entirely.
What is the best size for a raised garden bed?
A width of roughly 3 to 4 feet works well when the bed is reachable from both sides, but comfortable reach is more important than a fixed number. Make a bed against a wall or fence narrower because you can approach it from only one side.
How deep should a raised garden bed be?
Over healthy native soil, the frame itself can be relatively shallow because roots can continue downward. On concrete or another impermeable surface, provide enough contained soil for the crops; University of Maryland suggests about 8 inches minimum for some shallow-rooted crops and 12–24 inches for crops such as tomatoes, peppers, and squash.
Can I put a raised garden bed directly over grass?
Yes, but remove or kill vigorous vegetation first rather than assuming a permanent barrier is required. Loosening compacted soil underneath can also improve root access.
Should I put landscape fabric underneath a raised bed?
Usually not when the bed is over normal soil. A bottom barrier can restrict root growth. Permeable landscape fabric can be useful on a hard surface when the goal is to contain soil while allowing drainage.
What kind of wood is best for a raised garden bed?
Cedar is a strong choice when you want untreated wood with good natural decay resistance. Budget lumber such as pine or fir costs less but usually deteriorates faster. Modern residential pressure-treated lumber is another option; follow current product labeling rather than applying outdated CCA assumptions to today’s treatments.
Does a raised garden bed need drainage holes?
An open-bottom bed over soil doesn’t need drilled drainage holes because excess water can move into the ground below. A bed on an impermeable surface needs a clear drainage route, so don’t seal the bottom with nonpermeable plastic.
Final Takeaway
A useful raised bed is defined less by its appearance than by how well it fits the gardener and the site.
Keep it narrow enough to reach. Build only as tall as the crops and gardener require. Plan the paths and irrigation before adding soil. Choose a material you are comfortable maintaining, and calculate the fill volume before heading to the store.
Those choices prevent the most expensive mistakes.
If you’re planning more of your outdoor space, HomeWorks Daily has additional gardening guides covering plant choices and everyday yard care. Start with the related garden topics above, then adapt your raised bed to the sunlight, climate, soil, and way you actually garden.








2 Responses