
Imagine walking into a bedroom that has beautiful furniture, carefully chosen wall colors, and soft lighting, yet something still feels missing. The room looks comfortable, but it lacks the architectural detail that makes a space feel finished.
Sometimes, the answer isn’t another piece of furniture or a more expensive light fixture. It may be the ceiling.
A tray ceiling introduces depth and dimension by raising the central portion of the ceiling above the surrounding perimeter. With the right paint, trim, and lighting, this feature can transform an otherwise ordinary room into a more polished and visually interesting space.
But is it right for every home? Not necessarily. Ceiling height, room proportions, construction requirements, and installation costs all influence whether this design makes sense.
In this guide, you’ll discover popular tray ceiling ideas, lighting options, advantages and disadvantages, realistic cost considerations, and practical tips to help you decide whether this architectural feature belongs in your home.

What Is a Tray Ceiling?
A tray ceiling is a ceiling design in which the central section sits higher than the surrounding perimeter, creating a recessed or stepped appearance that resembles an upside-down tray. It can be simple or decorative, with options such as contrasting paint, crown molding, recessed lights, and indirect lighting.
Unlike a flat ceiling, which creates one continuous surface, a tray ceiling introduces a change in height that draws the eye upward.
The central section may be rectangular, square, or adapted to the room’s layout. Some designs feature a single step, while others use multiple levels for a more dramatic appearance.
Tray ceilings are commonly considered for:
- Primary bedrooms and guest bedrooms.
- Living rooms and family rooms.
- Dining rooms.
- Open-plan spaces where a specific area needs visual definition.
- New homes and selected remodeling projects.
The appeal is straightforward: a relatively simple ceiling shape can add character without requiring the entire room to be redesigned.
However, a decorative tray ceiling doesn’t automatically increase a room’s actual height. Its effect depends on the design, lighting, proportions, and existing ceiling structure.
What Does a Tray Ceiling Look Like?
Picture a rectangular bedroom with a flat ceiling. Now imagine the center appearing slightly higher than the outer edges, with a clean border running around the room.
That raised center and lower perimeter create the defining shape of a tray ceiling.
The result can look subtle or dramatic depending on the depth, finish, and lighting.
A shallow tray painted the same color as the surrounding ceiling may add understated architectural detail. A deeper tray with contrasting paint, decorative molding, and concealed lighting creates a stronger focal point.
Common tray ceiling shapes
Rectangular tray ceiling: A popular choice for bedrooms and living rooms, especially where the room has a straightforward rectangular layout.
Square tray ceiling: Often works well in nearly square rooms, where a balanced central feature can complement the furniture arrangement.
Multi-level tray ceiling: Uses additional steps to create a more elaborate appearance. It can suit larger rooms but requires careful planning to avoid visual clutter.
Curved or rounded tray ceiling: Introduces softer lines and may complement traditional or custom interiors. Curved detailing can require more specialized finishing.
The best shape usually follows the room rather than competing with it. For example, a rectangular tray above a dining table can reinforce the table’s position, while an elaborate multi-level design may be unnecessary in a small guest bedroom.
Popular Tray Ceiling Design Ideas

A tray ceiling doesn’t have to look formal or old-fashioned. Its appearance depends largely on the finishes and details you choose.
1. Simple white tray ceiling
A white tray ceiling with crisp edges creates dimension without making the ceiling the dominant feature.
This approach works well in neutral bedrooms, contemporary living rooms, and homes where the furniture or artwork should remain the main focus.
Consider using a consistent white across the ceiling and its raised center. The shadows created by the different levels provide enough contrast to make the design noticeable.
2. Modern tray ceiling with clean lines
Modern designs generally benefit from simple geometry, restrained decoration, and carefully planned lighting.
Consider combining:
- Straight, square edges.
- Minimal or no decorative molding.
- A consistent neutral color palette.
- Recessed lighting where suitable.
- Concealed LED lighting for a soft glow.
The goal is to create architectural interest without adding too many competing details.
3. Tray ceiling with contrasting paint
Color is one of the easiest ways to change the visual impact of a tray ceiling.
A soft beige, muted gray, warm taupe, or restrained blue can distinguish the central panel from the surrounding ceiling. A darker shade can create a dramatic effect, especially when paired with light walls.
Before committing to a bold color, test a sample under the room’s actual lighting. A shade that looks balanced in daylight may appear considerably darker at night.
A useful rule is to choose one primary visual feature. If the central panel has a strong color, keep the trim and lighting relatively simple.
4. Tray ceiling with crown molding
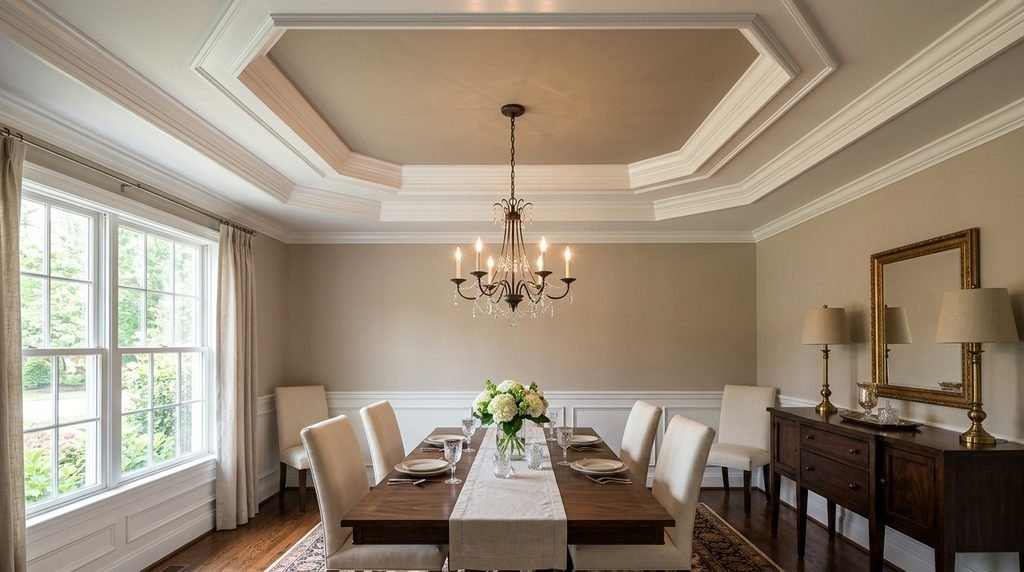
Crown molding adds a more traditional finish to the transition between the ceiling levels and the walls.
It may suit classic interiors, formal dining rooms, and bedrooms with traditional furniture.
However, molding isn’t essential. In a contemporary home, a clean-edged tray can look more appropriate than an ornate border.
5. Wood-accented tray ceiling
Wood details can introduce warmth and texture to an otherwise plain ceiling.
Depending on the home’s style, you might consider a wood-toned central panel, narrow decorative beams, or carefully selected wood-look finishes.
This approach can work in rustic, transitional, farmhouse-inspired, and some contemporary interiors.
Be mindful of visual weight. Dark wood, thick beams, and a low ceiling can make a room feel more enclosed. Lighter finishes may be easier to balance in smaller spaces.
6. Double tray ceiling
A double tray ceiling features multiple levels rather than a single raised center.
It can create a striking focal point in a spacious primary bedroom or living room, especially when combined with indirect lighting.
The trade-off is additional complexity. More levels mean more edges, finishing work, and opportunities for uneven lines to become noticeable.
If you’re working with a limited budget, a clean single-level tray may offer a better balance between appearance and cost.
Where Does a Tray Ceiling Work Best?
A tray ceiling can suit several areas of the home, but the most successful designs respond to the room’s dimensions and purpose.
Tray ceiling in a bedroom

Bedrooms are a natural place to consider this feature because the ceiling can help define the sleeping area.
A shallow tray above the bed, paired with warm indirect lighting, can create a calm and cohesive look. Neutral paint and simple trim keep the design from overwhelming the room.
For a smaller bedroom, avoid adding too many levels or using a very dark central color without testing it first.
Think about the entire view from the doorway, too. The ceiling should complement the bed, nightstands, curtains, and other major features rather than compete with them.
Tray ceiling in a living room

Living rooms often contain several competing elements: sofas, television screens, artwork, windows, and decorative lighting.
A tray ceiling can help tie the space together, particularly in a room with a clearly defined seating area.
For open-plan homes, a tray over the living room may visually distinguish that zone from the dining or kitchen area without adding a full-height partition.
Keep the lighting plan coordinated with the furniture layout. A central chandelier, for example, should relate to the seating arrangement rather than simply sit in the geometric center of the entire room.
Tray ceiling in a dining room
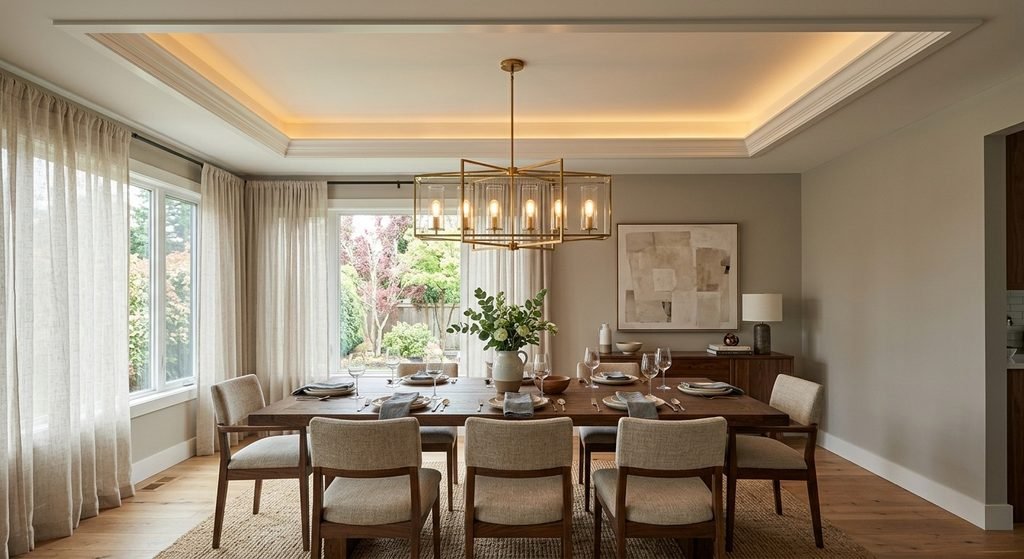
A dining table provides a natural reference point for a ceiling feature.
A tray positioned over the table can emphasize the gathering area, while a pendant or chandelier creates a visual connection between the ceiling and the furniture.
For a balanced appearance, consider how the tray aligns with the table and surrounding walls. An awkwardly positioned feature can look off-center even if the ceiling itself is symmetrical.
Tray ceiling in other spaces
Tray ceilings may also work in larger entry areas, selected kitchens, or rooms with distinctive architectural features.
The key is to avoid adding complexity simply because space is available. A tray ceiling is most effective when it has a clear purpose, such as highlighting a dining area, creating a focal point, or reinforcing the room’s overall design.
Tray Ceiling Lighting Ideas

Lighting can make a tray ceiling look subtle, warm, dramatic, or highly decorative. It can also affect how clearly the different ceiling levels appear.
Recessed lighting
Recessed fixtures provide a relatively clean appearance because much of the fixture sits inside the ceiling.
They can support general illumination or highlight particular areas, depending on their placement and beam direction.
Plan the number and location of lights around the room’s purpose. A bedroom may need softer, layered lighting, while a living room may require different settings for reading, entertaining, and watching television.
Cove lighting and concealed LEDs
Cove lighting places a light source within a recessed detail so the light reflects off a nearby ceiling or wall surface.
LED strips are commonly considered for this effect because they can create a continuous glow around the tray’s perimeter.
This approach works particularly well when you want the architectural shape to remain visible without relying on a bright central fixture.
Before installation, consider:
- Whether the light source will be visible from normal viewing positions.
- How the strip or fixture can be accessed for maintenance.
- Whether the light output is even around corners.
- Whether the LEDs are dimmable and compatible with the selected controls.
- Whether the color temperature suits the room.
Chandeliers and pendant lights
A chandelier can make a tray ceiling feel more formal, particularly in a dining room or primary bedroom.
Pendant fixtures may also work when the tray highlights a specific zone.
Check the fixture’s size, mounting requirements, weight, and clearance before making a selection. Electrical installation and any required support modifications should be handled in accordance with applicable codes by qualified professionals.
Choosing the right lighting approach
| Lighting option | Visual effect | Best consideration |
| Recessed lights | Clean, functional illumination | Placement and glare control |
| Concealed LED strips | Soft, indirect glow | Maintenance access and even output |
| Chandelier | Decorative focal point | Fixture size and mounting support |
| Pendant lights | Focused visual emphasis | Position relative to furniture |
| Wall lights combined with ceiling lighting | Layered illumination | Coordinating brightness and controls |
A practical recommendation is to plan the lighting before the ceiling is built or finished. Retrofitting wiring and fixtures later may involve additional work.
Tray Ceiling Paint, Trim, and Material Choices

Finishes determine whether a tray ceiling blends into the room or becomes its main decorative feature.
Choosing the right paint color
White is a dependable choice for a bright, understated look. However, the best color depends on the walls, flooring, natural light, and other finishes.
Consider these approaches:
- White on white: Creates a subtle architectural effect through shadows and depth.
- Warm neutral center: Adds gentle contrast in a beige or cream interior.
- Dark central panel: Creates a stronger focal point in a room with suitable height and lighting.
- Muted accent color: Adds personality without overwhelming the space.
Sample colors before painting the entire ceiling. The central panel and perimeter may receive light differently, which can make the same color appear slightly different across the surfaces.
Trim and decorative molding
Trim can emphasize the edges of the tray and create a more finished transition.
Simple profiles usually suit modern interiors, while more detailed molding can complement traditional rooms.
If the room already has decorative wall panels, patterned wallpaper, ornate furniture, and a statement chandelier, a restrained tray may provide better visual balance than another elaborate feature.
Drywall and other finishes
Drywall is commonly used to create the stepped geometry of a tray ceiling. The final appearance depends heavily on accurate framing, smooth joints, and careful finishing.
Wood accents and other decorative materials can add texture, but they introduce additional decisions about weight, fastening, maintenance, and compatibility with the existing structure.
Use materials appropriate for the room’s conditions and have any structural implications evaluated before installation.
Pros and Cons of a Tray Ceiling
A tray ceiling can add architectural character, but it’s worth weighing the benefits against the practical considerations.
| Advantages | Potential drawbacks | What to consider |
| Adds depth and visual interest | Costs more than a plain ceiling | Establish a realistic budget |
| Creates a natural focal point | May not suit every room | Match the design to room proportions |
| Supports decorative lighting | Lighting can increase project costs | Plan fixtures early |
| Offers flexible paint and trim options | More edges can collect dust | Consider cleaning access |
| Can help define a zone in an open-plan room | Retrofitting may involve disruption | Review framing and existing systems |
| Can complement traditional or modern interiors | Poor proportions may feel awkward | Prioritize scale over decoration |
Benefits worth considering
The main advantage is architectural definition. A tray can make a room feel more thoughtfully designed without requiring a complex pattern across the entire ceiling.
It also provides flexibility. You can use subtle paint and simple edges for a quiet look or add lighting and trim for a more decorative result.
In an open-plan home, a tray can help emphasize a dining or seating area while preserving the sense of openness.
Drawbacks to keep in mind
A tray ceiling usually requires more labor and coordination than a basic flat ceiling. Framing, drywall finishing, painting, and electrical work can all affect the final price.
The extra edges may also need occasional dusting and maintenance. If the design includes concealed lights, you should know how to access them for repairs or replacement.
Finally, a tray ceiling does not guarantee a higher resale price. Its appeal depends on local buyer preferences, the quality of the work, and the overall condition and design of the property.
Tray Ceiling Cost: What Should Homeowners Expect?
The cost of a tray ceiling depends on the room size, design complexity, labor rates, finish, and whether the feature is being added during new construction or to an existing home.
For a US planning reference, HomeGuide’s tray ceiling cost guide reports a typical range of $3–$7 per square foot, with an example total of $700–$1,600 for a 15-by-15-foot room. These are published estimates, not a guaranteed quote, and actual costs vary by location and project scope. See the HomeGuide tray ceiling cost guide.
What affects the installation price?
Room dimensions: Larger ceilings may require more framing, drywall, and finishing.
Design complexity: Multiple levels, curved details, custom trim, and intricate layouts can increase labor.
New construction versus remodeling: Including the tray in the original design may simplify coordination. Remodeling can involve demolition, protection of furnishings, and work around existing wiring or HVAC systems.
Lighting: Recessed fixtures, LED strips, dimmers, chandeliers, and new wiring may add to the budget.
Finishing: Paint, trim, drywall texture, and the quality of the final surface affect both materials and labor.
Structural requirements: Existing joists, trusses, ductwork, pipes, and other concealed systems can limit the available options. Structural changes may require professional evaluation and additional expense.
Location: Local labor rates, contractor availability, and permit requirements influence the final price.
Illustrative cost ranges
The following examples apply HomeGuide’s published $3–$7-per-square-foot range to different room sizes. They are arithmetic illustrations, not individualized estimates.
| Room dimensions | Approximate area | Illustrative cost at $3–$7/sq. ft. |
| 10 × 10 ft. | 100 sq. ft. | $300–$700 |
| 12 × 12 ft. | 144 sq. ft. | $432–$1,008 |
| 15 × 15 ft. | 225 sq. ft. | $675–$1,575 |
| 16 × 20 ft. | 320 sq. ft. | $960–$2,240 |
These figures may not include every possible expense, such as premium lighting, extensive demolition, structural engineering, duct relocation, or permit fees. Confirm what each contractor includes in the estimate.
How to keep the budget under control
- Choose a straightforward single-level design if it meets your goals.
- Decide on lighting before construction begins.
- Compare written estimates based on the same scope of work.
- Ask whether painting, cleanup, trim, and electrical work are included.
- Keep a contingency for concealed conditions and approved changes.
- Avoid selecting a contractor on price alone; review relevant experience, insurance, references, and local licensing requirements.
For a larger renovation, it may be useful to compare the tray ceiling with other ceiling options before committing to the work.
How to Decide Whether a Tray Ceiling Is Right for Your Home
The most attractive design isn’t necessarily the best one for your space. Start with the room itself, then decide how much architectural detail it can support.
Use this checklist before requesting a quote.
1. Check the existing ceiling height
A tray lowers the perimeter relative to the raised central section. If the room already feels low, adding a deep border may make the edges feel more enclosed.
Ask a qualified contractor to evaluate the actual dimensions and explain how much usable height the proposed design will leave.
2. Consider the room’s proportions
A long rectangular room may suit a rectangular tray, while a more compact room may benefit from a simple, shallow design.
Think about where the main furniture sits. A tray should relate to the room’s layout, not just its outer walls.
3. Set a realistic budget
Include framing, drywall, finishing, paint, lighting, and professional services where required.
If the budget is tight, prioritize good proportions and clean workmanship over complicated decorative details.
4. Match the home’s architectural style
A tray ceiling should feel connected to the rest of the home.
For a modern interior, clean lines and restrained finishes may be the strongest choice. A traditional room may accommodate molding or a decorative fixture more naturally.
5. Think about maintenance
Additional edges, trim, and concealed lighting may require more attention over time.
Consider whether you can safely reach the relevant surfaces and whether fixtures can be serviced without dismantling decorative elements.
6. Ask about resale without assuming a return
A well-executed tray may appeal to some buyers, but no ceiling feature guarantees a higher sale price.
Focus first on whether the design improves your own use and enjoyment of the room. If resale is a priority, ask a local real estate professional about preferences in your market.
Tray Ceiling vs. Coffered Ceiling vs. Vaulted Ceiling
These ceiling styles create different effects and involve different construction considerations.
A tray ceiling has one main raised central area. A coffered ceiling uses a pattern of recessed panels, often separated by beams. A vaulted ceiling rises above the usual flat ceiling plane, often following the roof structure.
| Feature | Tray ceiling | Coffered ceiling | Vaulted ceiling |
| Basic structure | Raised center with lower perimeter | Repeated recessed panels or boxes | Elevated ceiling that often follows a roof slope |
| Visual effect | Defined center and layered depth | Repeated geometric pattern | Greater vertical volume |
| Design emphasis | One main area | Whole-ceiling pattern | Overall room height |
| Typical complexity | Depends on tray depth and finish | Often increases with panel count and detailing | Can require major structural work |
| Lighting options | Cove lights, recessed lights, central fixture | Recessed lights or fixtures within the pattern | Pendants, chandeliers, and other suitable fixtures |
| Height considerations | Requires careful perimeter-height planning | Beam depth can affect perceived height | Depends on roof and structural design |
| Potential cost | Often less complex than major ceiling-raising work | Decorative detailing can increase costs | Raising an existing ceiling can be a major project |
| Best suited for | A defined focal point | A formal or patterned ceiling treatment | A room designed for a greater sense of vertical space |
Which ceiling design should you choose?
Choose a tray ceiling if you want one central architectural feature without covering the entire ceiling in a repeated pattern.
Consider a coffered ceiling if you like geometric detail and want a more structured, decorative effect.
A vaulted ceiling may be appropriate if greater vertical volume is a primary goal and the building’s design supports it. Creating one in an existing home can involve substantial structural changes, so it shouldn’t be treated as a simple decorative upgrade.
The HomeGuide ceiling installation cost guide provides additional context on how ceiling types can differ in installation cost.
Tray Ceiling Installation: What to Know Before Starting

Installing a tray ceiling involves more than creating a decorative border. The existing structure, available height, wiring, HVAC systems, and desired finish all affect the plan.
For an existing home, a typical planning process includes the following steps.
Step 1: Inspect the ceiling and surrounding structure
Identify the existing framing, joists or trusses, electrical wiring, pipes, and ductwork that may affect the design.
Do not cut, remove, or alter structural members without an appropriate assessment. A qualified professional can determine whether the proposed design is feasible and whether engineering review is needed.
Step 2: Finalize the dimensions
Decide how far the central section will extend, how deep the perimeter will be, and where the transitions will sit.
Review these dimensions from normal viewing positions. A drawing that looks balanced from above may feel different when viewed from the doorway or bed.
Step 3: Coordinate lighting and other systems
Determine the positions of recessed lights, decorative fixtures, switches, dimmers, and any concealed lighting.
Check for conflicts with HVAC ducts, plumbing, insulation, and access points before framing or closing the ceiling.
Step 4: Complete framing and drywall work
The installer builds the required framework and finishes the ceiling surfaces. Accurate alignment is important because uneven edges and imperfect joints can be especially visible under directional lighting.
Step 5: Paint and install the finishing details
Once the surfaces are ready, the project can move to painting, trim, and fixture installation.
Allow for the finish to be viewed under both daytime and nighttime lighting. Small imperfections may become more obvious when light grazes across the surface.
Step 6: Inspect the completed work
Check that the lines are consistent, the paint is even, the lights operate correctly, and the relevant electrical and construction work meets applicable requirements.
Permits and licensing requirements vary by location and project scope. Confirm local requirements before work begins.
Common Tray Ceiling Design Mistakes to Avoid
Even an attractive concept can disappoint if the details aren’t planned carefully.
Choosing a design that’s too deep
A deep tray can feel dramatic in a spacious room but may make the perimeter feel low in a smaller space.
Better approach: Compare the proposed dimensions with the existing ceiling height and view a drawing or sample layout before approving construction.
Adding too many decorative features
Contrasting paint, elaborate molding, wood details, multiple levels, and statement lighting can compete for attention.
Better approach: Choose one or two main features and let the ceiling’s shape do the rest.
Ignoring the furniture layout
A ceiling feature may look off-center if it doesn’t relate to the bed, dining table, or seating area.
Better approach: Plan the ceiling and furniture together, particularly in open-plan rooms.
Treating lighting as an afterthought
Poorly positioned fixtures can create glare, uneven illumination, or unwanted shadows.
Better approach: Coordinate fixture locations, brightness, controls, and maintenance access before the ceiling is finished.
Underestimating the full project cost
A basic installation estimate may not cover every detail, such as painting, premium trim, wiring changes, or unexpected structural conflicts.
Better approach: Request an itemized quote that clearly identifies inclusions, exclusions, allowances, and possible additional charges.
Forgetting long-term maintenance
Dust can collect around trim and recessed edges, while concealed lighting may require occasional servicing.
Better approach: Choose details that can be cleaned and repaired without unnecessary difficulty.
Frequently Asked Questions About Tray Ceilings
What is a tray ceiling?
A tray ceiling has a raised central section surrounded by a lower perimeter. The change in height creates a layered appearance that can be customized with paint, molding, and lighting.
Does a tray ceiling make a room look bigger?
It can make a room feel more open by drawing attention to the raised center, but the effect depends on ceiling height, proportions, color, and lighting. A deep tray in a low room may have the opposite effect.
Is a tray ceiling suitable for a low ceiling?
It may be possible to create a shallow or decorative version, but the lowered perimeter can make the room feel more enclosed. Have the proposed dimensions evaluated before deciding.
How much does a tray ceiling cost?
HomeGuide reports a typical estimate of $3–$7 per square foot for a tray ceiling, with a published example of $700–$1,600 for a 15-by-15-foot room. Actual costs depend on location, labor, finishes, lighting, and project complexity. Obtain local quotes before budgeting.
Is a tray ceiling outdated?
A tray ceiling isn’t inherently outdated. Simple lines, restrained finishes, and lighting that suits the room can work with contemporary or traditional interiors. The overall design matters more than following a trend.
Which rooms are best for tray ceilings?
Bedrooms, living rooms, and dining rooms are common choices. The best location depends on ceiling height, room proportions, furniture placement, and whether the ceiling will help define a particular area.
Can you add lighting to an existing tray ceiling?
Yes, in many cases. The options depend on the existing construction, available wiring, fixture requirements, and access. A qualified electrician should evaluate electrical work and applicable code requirements.
Is a tray ceiling better than a coffered ceiling?
Neither is universally better. A tray ceiling emphasizes one large central area, while a coffered ceiling creates a repeated pattern of recessed panels. Choose according to the room, desired style, budget, and installation constraints.
Can a tray ceiling be installed in an existing home?
Often, yes, but feasibility depends on the structure, available height, wiring, HVAC systems, and the amount of remodeling required. A contractor should inspect the space before confirming the design and price.
Does a tray ceiling increase home value?
It may appeal to some buyers, but a higher resale price isn’t guaranteed. Workmanship, overall home condition, local preferences, and the quality of the renovation all matter.
Final Takeaway: Is a Tray Ceiling Worth It?
A tray ceiling can give a room a more finished appearance by adding architectural depth, highlighting a central area, and creating opportunities for layered lighting.
The best results usually come from a design that respects the room’s proportions. A simple tray with carefully planned lighting can be more effective than a complicated design that competes with the furniture and finishes.
Before starting, evaluate the ceiling height, structural requirements, full installation cost, and maintenance needs. Compare contractor estimates and confirm local permit and electrical requirements where applicable.
If a tray ceiling fits your home’s style and your budget, it can be a worthwhile design feature. If it makes the room feel crowded or requires more construction than you want, a simpler ceiling treatment may be the better choice.
For more practical home planning, decorating, and improvement guidance, explore the related resources on HomeWorks Daily and find ideas that make sense for your space, budget, and everyday life.










One Response