Those little plants dangling from your spider plant aren’t just decorative. A mature spider plant is often doing much of the propagation work for you by producing miniature plantlets—commonly called spiderettes or spider plant babies—on long arching stems.
If you’re wondering how to propagate spider plant, the basic process is simple: choose a healthy plantlet, let it develop at least the beginnings of a root system when possible, then either place it directly into moist potting mix or root it in water before potting it. You can also let a young plantlet root in a second pot while it remains attached to the mother plant.
Spider plants (Chlorophytum comosum) are particularly well suited to propagation from these naturally produced plantlets. University Extension guidance describes both potting already-rooted plantlets and allowing babies to root while they remain connected to the parent plant.
The important part isn’t making the process complicated. It’s knowing when a baby is ready, keeping the new roots moist without waterlogging them, and giving the young plant enough light to establish itself.
Quick Answer: How Do You Propagate a Spider Plant?
To propagate a spider plant, select a healthy spiderette, preferably one with visible white or tan root nubs. Cut it from the runner with clean scissors and either place its roots in a small container of water or plant it directly into a small pot filled with moist, well-draining potting mix.
If the plantlet hasn’t developed roots yet, you don’t necessarily have to cut it off. Place the baby on moist potting mix in a separate pot while leaving the runner attached to the mother plant. Pin it gently against the mix and cut the connecting stem only after roots have developed.
Illinois Extension notes that spider plant plantlets commonly develop short white aerial roots while still attached and that rooting an attached plantlet in soil may take roughly two to three weeks, although actual timing varies with growing conditions.
What Is Spider Plant Propagation?
Propagation simply means producing a new plant from an existing one.
With spider plants, the easiest method usually involves the miniature plants that form along their runners. These babies are already structured like tiny plants, complete with leaves and, as they mature, developing roots.
That makes propagating a spider plant different from rooting a typical leaf or stem cutting. You aren’t trying to convince a bare piece of stem to become a plant. You’re helping an already formed plantlet become independent.
Spider plants can also be divided when a mature parent has developed a large, crowded clump, but plantlet propagation is usually the most convenient method for a homeowner with dangling spiderettes.
What You’ll Need Before You Start
You don’t need a propagation station full of specialized equipment.
For most spider plant babies, gather:
- A healthy mother plant with one or more plantlets
- Clean scissors or pruning snips
- A small pot with a drainage hole
- Fresh houseplant potting mix or another well-draining growing medium
- Water
- A small glass or jar if you’re using water propagation
- A bent paper clip, small piece of wire, or plant pin if you’re rooting the baby while it’s still attached
A small container is usually better than an oversized one. A tiny root system doesn’t need a large volume of wet potting mix surrounding it. Using a pot that fits the current plant makes moisture management much easier.
For more detail on why drainage and appropriately sized containers matter for indoor plants, HomeworkDaily.com’s croton plant care guide covers the same useful container-growing principles.
How to Propagate Spider Plant in 7 Easy Steps
Step 1 — Choose a Healthy Spider Plant Baby
Start with a plantlet that looks vigorous rather than simply choosing the smallest baby on the runner.
Look for:
- Several healthy leaves
- A firm center
- No obvious pests
- No mushy or blackened tissue
- Some size and substance rather than a newly formed nub
- Visible root bumps or small aerial roots, if possible
A plantlet with existing roots has a head start, but don’t assume a baby is unusable simply because its roots are small.
Illinois Extension notes that gardeners can successfully pot spider plant plantlets before they have developed a complete root system. Still, waiting for at least the beginnings of aerial roots generally gives the new plant less work to do after separation.
Step 2 — Check Whether the Plantlet Has Roots
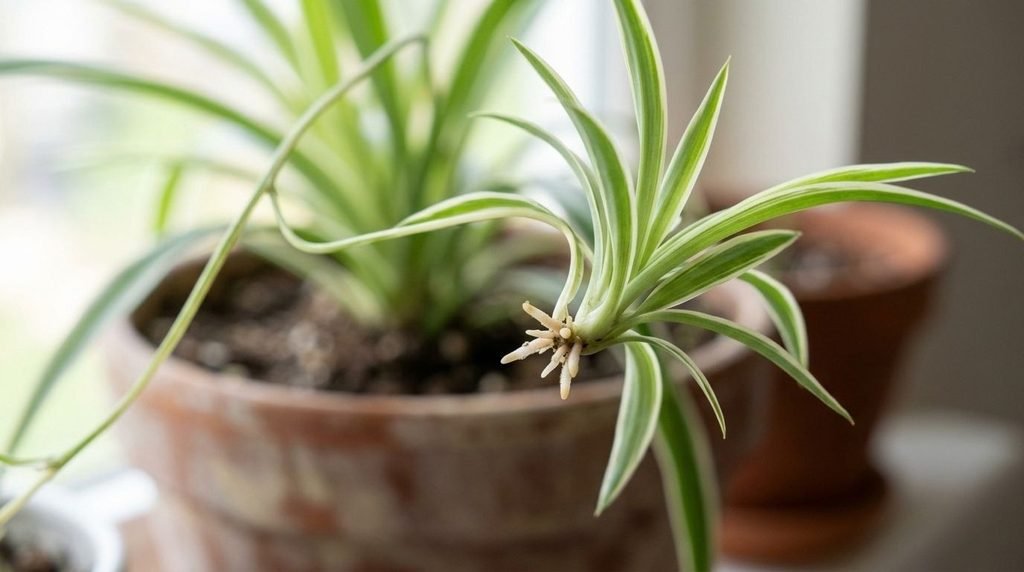
Turn the spiderette over and inspect its base.
You may see small pale or whitish projections. These are developing aerial roots. As the plantlet matures, they become more noticeable and are capable of growing into the potting mix once they make contact with a suitable moist medium.
If several roots are already visible, you can usually separate and pot the baby.
If there are no roots—or the plantlet seems especially small—consider rooting it while it remains attached to the mother plant.
Place a small pot of moist potting mix beside the parent plant, rest the plantlet’s base against the surface, and secure it gently with a bent paper clip or piece of wire. Keep the runner intact.
University of Wisconsin–Madison Extension specifically recommends this technique for spider plants: the plantlet can develop roots while it continues receiving support from the mother plant, then the connecting stem can be cut.
Don’t rush this part. Separating a completely immature plantlet isn’t automatically fatal, but it removes the safety net provided by the parent plant.
Step 3 — Decide Between Water and Soil Propagation
Both methods can work.
Water propagation makes root growth easy to observe. You’ll know exactly when new roots are extending, which is reassuring if this is your first propagation attempt.
Direct-to-soil propagation avoids the later step of transferring water-grown roots into potting mix. If your plantlet already has useful aerial roots, soil is often the simplest route.
There is also a third option: attached soil propagation, where you root the plantlet in another pot before cutting it from the mother plant. This is especially useful for an immature spiderette.
The Royal Horticultural Society recognizes both direct potting and rooting detached spider plant babies in water as viable propagation methods.
For most beginners who want to watch progress, water is satisfying and easy to monitor. For a plantlet that already has several visible roots, I’d generally favor direct-to-soil propagation because the plant can immediately establish roots adapted to its long-term growing medium.
Step 4 — Separate the Plantlet Correctly
Once you’ve decided to detach the baby, use clean scissors or pruning snips.
Cut the thin runner connecting the plantlet to the mother plant. You can trim away excess runner afterward, but avoid accidentally cutting into the crown—the central point where the baby’s leaves and roots meet.
You don’t need to cut leaves off a healthy spiderette.
If you’re using the attached-soil method, don’t separate it yet. Wait until roots have developed enough to hold the baby in its new pot.
One clue is gentle resistance when the plantlet is lightly nudged. New growth is an even better sign. Avoid repeatedly pulling it out of the pot to inspect its roots; that can damage exactly the roots you’re trying to establish.
Step 5 — Root the Spider Plant Baby
If You’re Propagating in Soil
Fill a small pot with fresh, well-draining potting mix and moisten it evenly.
Make a shallow opening for the roots. Position the plantlet so the roots and very base of the plant are in contact with the mix while the leafy crown remains above the soil surface.
Gently firm the mix around it.
The goal is good root-to-medium contact—not burying the whole plantlet.
Keep the mix lightly moist while new roots establish, but don’t leave it saturated. Spider plants tolerate some inconsistent watering, but continually waterlogged soil can lead to root problems. University of Wisconsin Extension specifically warns that overwatering or poorly drained soil can contribute to root rot.
If You’re Propagating in Water
Place the base of the spiderette in a small glass or jar.
Keep the root area submerged, but keep the leaves out of the water. Submerged foliage is more likely to deteriorate.
Place the container in bright, indirect light and maintain the water level. Refresh the water if it becomes cloudy.
University of Tennessee guidance recommends allowing very small aerial roots to develop in water before potting and moving the plantlet to potting soil once the roots have grown several inches.
Don’t leave the baby in water merely because the root display looks impressive. Water propagation is a rooting stage, not a requirement for permanent spider plant culture.
Step 6 — Give the New Plant Bright, Indirect Light
A newly propagated spider plant needs useful light for growth, but harsh sunlight isn’t an advantage.
Place it where it receives bright or medium indirect light rather than intense midday or afternoon sun.
University of Wisconsin–Madison Extension describes spider plants as performing well in medium to bright indoor light, while the RHS recommends bright indirect light and warns that strong sunlight can damage foliage.
Think of light as the energy supply that helps the baby build its new root system.
A dim corner may not kill it immediately, but establishment can be slower. On the other hand, moving a tender young plant directly into hot window sun can stress foliage at exactly the wrong time.
The same light-and-moisture balancing principle applies to many indoor tropical plants. HomeworkDaily.com’s prayer plant care guide offers another useful example of adjusting light and watering together rather than treating either in isolation.
Step 7 — Wait Until the Baby Is Truly Established
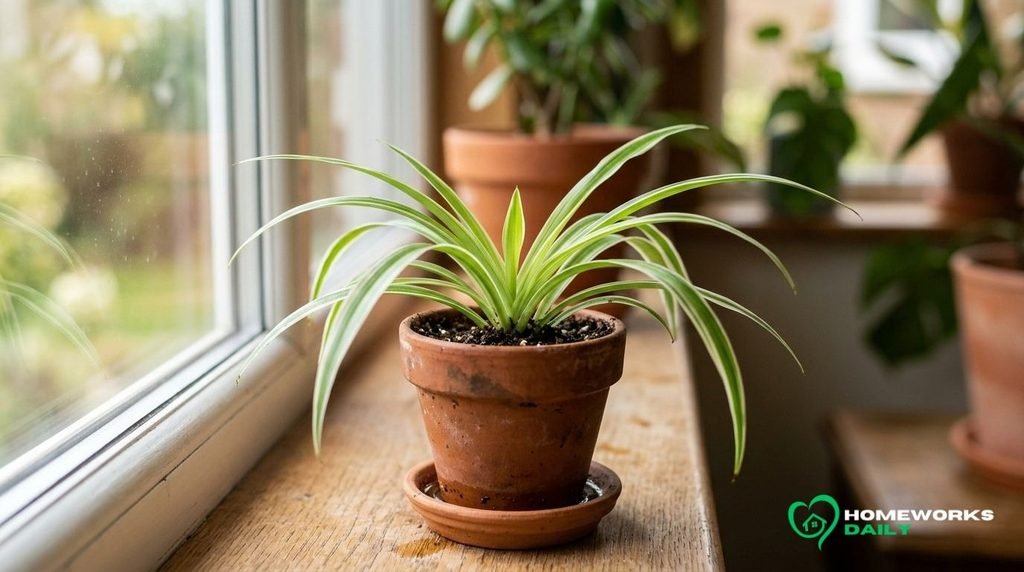
Rooting and becoming an established houseplant aren’t exactly the same thing.
A spiderette may begin producing roots relatively quickly, yet still need time before it behaves like a mature, independent plant.
Signs of establishment include:
- New leaves emerging from the center
- Firm, upright growth
- Resistance to a very gentle nudge
- Roots becoming visible near the side or bottom of a transparent nursery pot
- More predictable water use as the root system expands
Extension guidance suggests spider plant plantlets can begin establishing roots within a few weeks under favorable conditions. Illinois Extension gives roughly two to three weeks for attached plantlets to root, while Utah State educational material notes that water-rooted spiderettes may begin developing roots within roughly one to two weeks. These are useful expectations, not deadlines.
Temperature, plantlet maturity, light, season, and existing root development all affect the pace.
Water vs. Soil Spider Plant Propagation
Neither method is universally “better.” The right choice depends on what you value most.
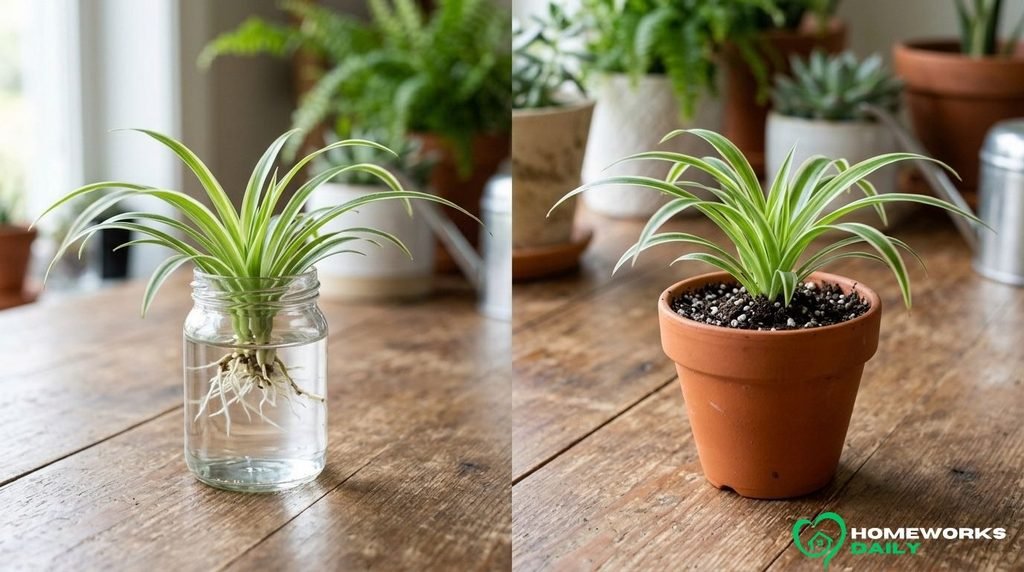
Water vs. Soil Spider Plant Propagation
| Factor | Water Propagation | Soil Propagation |
| Beginner friendliness | Very easy to monitor | Simple once watering is understood |
| Root visibility | Excellent | Roots stay hidden |
| Equipment needed | Small glass or jar | Small pot and potting mix |
| Existing roots required | Helpful but not essential | Strongly helpful |
| Transition after rooting | Must eventually move to potting mix | No second transition needed |
| Main advantage | You can watch root development | Roots develop in their long-term medium |
| Main drawback | Plant must adjust after transfer | Harder to see whether roots are forming |
| Best for | Small-rooted babies and visual monitoring | Plantlets with visible aerial roots |
Water propagation is a good teaching tool because the process is visible.
Soil propagation is more direct.
Washington State University Extension notes more generally that water-rooted houseplant cuttings are best moved to potting medium once they have a modest root network rather than being allowed to develop an excessively large water-grown root system.
For a spider plant baby with strong aerial roots, there’s usually little reason to add an unnecessary water stage unless you simply prefer it.
Should You Cut Spider Plant Babies Before Rooting Them?
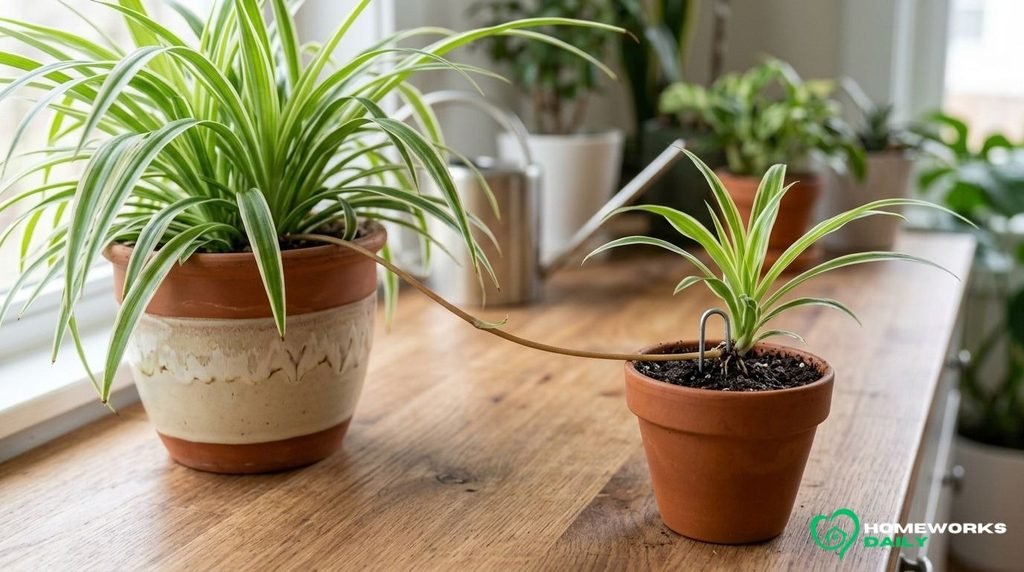
You can, but you don’t have to.
If the spiderette already has visible aerial roots, separating it first is usually reasonable. If it has little or no root development, keeping it connected while rooting it in a nearby pot is a particularly forgiving method.
Penn State Extension describes spider plant propagation by natural layering: a plantlet without roots can be placed against growing medium while still connected to the parent and separated once roots have formed.
This is one of the most useful propagation tricks for spider plants because it reduces the urgency. The mother plant continues supporting the baby while the plantlet builds its own root system.
Can You Propagate a Spider Plant Without Visible Roots?
Yes.
Spider plant babies don’t need a complete root system before propagation. Some plantlets will root successfully after separation even when only tiny root nubs are present.
For a completely rootless or very immature spiderette, however, the attached-soil method is the more cautious choice.
That distinction matters: possible and ideal aren’t always the same thing.
If there’s no reason to hurry, allowing some root development before separation increases your margin for error.
How Long Does Spider Plant Propagation Take?
Root development can begin in roughly one to three weeks under favorable conditions, but a spider plant baby may need several additional weeks before it feels securely established.
Don’t treat a calendar estimate as a pass-or-fail test.
A baby that begins with multiple aerial roots may establish quickly. A smaller plantlet separated early, kept in cooler conditions, or grown under weak light may take longer.
The better question is: Is the plant producing roots and new growth?
When transferring a water-rooted plantlet, University of Tennessee guidance suggests potting once its roots have grown a few inches rather than waiting indefinitely.
What Is the Best Time to Propagate Spider Plants?
Spring and summer are generally convenient times because indoor plants typically receive longer days and are actively growing, but spider plant propagation isn’t restricted to one season.
University of Wisconsin Extension notes that spider plants grown indoors may produce their flowering stems and plantlets at different times of year.
If your plant produces a healthy, rooted spiderette in fall or winter, you don’t necessarily need to wait months before propagating it.
Just pay closer attention to:
- Lower indoor light
- Cooler windows
- Slower drying potting mix
- Reduced growth
- Overwatering during short winter days
In other words, respond to the plant and its growing conditions rather than the date alone.
What Pot Size Is Best for a Spider Plant Baby?
Start small.
A 3- to 4-inch pot is usually a practical size for a single small plantlet, depending on its root system. What matters most is choosing a container only modestly larger than the existing roots and ensuring it has drainage.
The mistake is assuming more soil automatically creates more room for growth.
A large pot holds much more moisture than a small root system can use. If that mix remains wet for prolonged periods, root establishment becomes harder rather than easier.
As the roots eventually fill the container, move the spider plant up gradually.
How Should You Water a Newly Propagated Spider Plant?
Keep the root zone consistently but lightly moist while the baby is establishing, particularly with direct-to-soil propagation.
Don’t keep it swampy.
Once the plant develops a functional root system, you can gradually shift toward normal spider plant care and allow the upper portion of the potting mix to dry slightly between thorough waterings.
The RHS advises keeping spider plant growing media lightly moist while avoiding standing water, and Wisconsin Extension similarly recommends allowing the soil to dry somewhat between thorough waterings once plants are established.
Drainage matters just as much as watering frequency.
Common Spider Plant Propagation Mistakes
Spider plant propagation is forgiving, but a few avoidable mistakes create most of the trouble.
- Separating an extremely immature baby too soon. It may still root, but waiting for root nubs or using attached propagation is easier.
- Keeping the soil saturated. New roots need moisture and oxygen. Constantly waterlogged mix creates poor root conditions.
- Using an oversized pot. Too much unused wet potting mix can make moisture management difficult.
- Burying the crown. Cover the roots, not the entire center of the plantlet.
- Putting a newly rooted baby in harsh direct sun. Bright indirect light is the safer starting point.
- Submerging leaves during water propagation. Keep the roots or plantlet base in water while the foliage remains above it.
- Waiting for an enormous root mass in water. Transfer once a useful root system has formed rather than turning temporary water propagation into long-term culture.
- Constantly pulling the plantlet up to check its roots. New roots are delicate. Look for new growth and gentle resistance instead.
What Should You Do If a Spider Plant Baby Won’t Root?
Start by checking the growing conditions rather than immediately throwing the plantlet away.
If It’s in Water
Make sure the base or roots are actually contacting the water while the foliage stays above the surface.
Then check:
- Is the water cloudy or unpleasant-smelling?
- Is the plant sitting in intense sun?
- Is the location unusually cold?
- Was the plantlet extremely immature when removed?
- Is the base becoming soft or dark?
Refresh cloudy water and move the container to a bright, stable location away from harsh sunlight.
If the plantlet remains firm and healthy, give it time.
If It’s in Soil
Check the moisture deeper in the pot.
A dry surface doesn’t always mean the entire container is dry, and a constantly wet mix can be just as troublesome as drought.
If the plantlet is sitting loosely on top of the mix, gently improve contact between the root area and growing medium. Don’t bury the crown.
If an unrooted baby repeatedly struggles after separation, use the attached-soil method with another plantlet. It gives the new baby time to root before losing support from the parent plant.
Spider Plant Propagation Aftercare Checklist
Once the new plant is potted, keep care simple:
- Give it bright to medium indirect light.
- Keep the potting mix lightly moist during initial establishment.
- Allow excess water to drain freely.
- Protect it from intense direct sunlight.
- Avoid cold drafts.
- Don’t repeatedly disturb developing roots.
- Wait for active new growth before treating it like a mature plant.
- Increase pot size gradually as the root system expands.
There’s usually no need to push rapid growth with heavy fertilizer. Stable light, appropriate moisture, and healthy roots matter more during early establishment.
Spider Plant Propagation FAQs
Can you propagate spider plants in water?
Yes. Place the plantlet’s root area in water while keeping its leaves above the surface. Keep it in bright, indirect light and transfer it to potting mix after a useful root system has developed. The RHS and University of Tennessee both recognize water rooting as an appropriate method for spider plant babies.
Can spider plants be propagated directly in soil?
Yes. A spiderette with visible aerial roots can be planted directly into moist, well-draining potting mix. Direct-to-soil propagation avoids the later transition from water to potting mix and is particularly convenient for mature plantlets.
Can you propagate a spider plant baby without roots?
Yes, although a very immature rootless baby may be easier to establish if you leave it attached to the mother plant and pin it onto moist potting mix until roots develop. Extension sources specifically recommend this natural-layering method for spider plants.
When should spider plant babies be separated?
Separate them once they’re a reasonable size and preferably showing visible aerial roots. There’s no requirement to wait for a large root system, but some root development gives the plantlet a stronger start. Rootless babies can instead be rooted while still attached.
How long does it take a spider plant baby to root?
Roots can begin forming within roughly one to three weeks in favorable conditions, although establishment may take longer. Existing roots, light, warmth, moisture, and season all affect the timeline, so look for new growth rather than relying on a specific date.
What kind of soil should I use for spider plant propagation?
Use a quality houseplant potting mix that drains well while retaining enough moisture for new roots. Avoid dense garden soil and mixes that stay saturated for long periods. The container should also have a working drainage hole.
Why is my propagated spider plant turning brown?
Check moisture, drainage, light, and water quality rather than assuming there is one cause. Spider plant leaf-tip browning can be associated with watering extremes, dry conditions, excessive sun, salt or chemical buildup, and other environmental stresses.
Final Thoughts
Once you understand how to propagate spider plant babies, the process is surprisingly uncomplicated.
Choose a healthy spiderette. Give it a chance to develop roots. Decide whether you’d rather see those roots grow in water, plant them directly into potting mix, or let the baby root while it remains attached to the mother plant. Then provide bright indirect light, sensible moisture, good drainage, and a little patience.
For a plantlet with visible roots, direct-to-soil propagation is usually the simplest route. For gardeners who enjoy watching the process, water makes root development easy to see. And for a tiny baby with no roots, keeping it attached while it roots in a second pot provides an extra margin of safety.
The biggest mistake isn’t choosing the “wrong” propagation method. It’s making a forgiving plant harder to grow by drowning it, burying it too deeply, exposing it to harsh light, or disturbing its developing roots too often.
Give the plant a stable environment and let it do what spider plants naturally do: make more spider plants.
If you’re building out your indoor plant collection, explore more practical houseplant and garden advice in HomeworkDaily.com’s Gardening section.